Blog Background

Monday, October 1, 2012

Whole Wheat Apple Spice Muffins

Happy Fall, friends!!! 

I don't know about you, but I absolutely LOVE Fall! I'll be honest though, when I think of Fall, I think of what Fall is like back at home. Here in Utah, there seems to be only 2 seasons, Winter and Summer, with brief transition periods in between. 

Back home, in Northern California, Fall is beautiful. Golds, deep reds, bright oranges, luscious greens.  The air is so fresh and cool. And don't forget about all the great fruits and veggies that come to life. Some of my favorites Pomegranate, Parsnips, a huge variety of squash and of course APPLES! And let me tell you, we have an abundance of apples from the tree in our yard right now.  
Kind of wishing I took some good pictures of the tree in its glory. Now, sadly, it has been picked just about clean. So what to do with all of these apples? Well, I have made apple pie, apple sauce and these glorious muffins. 

I think some of you will be pleased to know that these amazing muffins have NO oil or butter in them and I would dare say they are very low in fat. But don't be discouraged, I promise you won't end up with rock hard, dry, sorry excuses for muffins...well, that is as long as you follow the recipe. If you're like me, baking can be a bit intimidating and end in disaster more than you would like to admit. Honestly though, I can say that things have been improving for me. I almost have this baking thing down. Boy, if you knew some of my goofy mistakes...
This recipe NOT being one of them :) 

Well, let's get on with it, shall we?


Whole Wheat Apple Spice Muffins
Makes 12 regular muffins


Ingredients:

1 cup whole wheat flour
1/2 cup AP flour
1 tsp baking soda
1 tsp baking powder
1/2 tsp salt
1/4 tsp cinnamon, make it a heaping one 
1/8 tsp pumpkin spice (or 1/4 tsp ground nutmeg + 1/8 tsp ground ginger + 1/8 tsp allspice)
1/3 cup Organic cane sugar, you may also use honey or brown sugar
1 egg
1/2 cup Greek yogurt, I used fat-free
1/3 cup applesauce, unsweetened if you want to be extra healthy
1/2 tsp vanilla extract
1 1/2 cups grated apples, number of apples you will use will vary on size 

Preheat oven to 400 degrees. 

To prep your apples:
Wash, peel and grate your apples. 

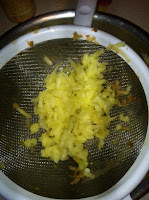
  You may want to grate them over a mesh strainer so that you can squeeze out the excess apple juice. We bottled ours after heating it almost to a boil. Yay for fresh apple juice! 

Measure out 1 1/2 cups. 

Now don't fret about the apples turning brown...they still taste fine and you're going to bake them anyway. No one will know :)


Set aside the shredded apples and grab yourself a couple of medium sized mixing bowls. 

In one you will combine all of the dry ingredients, and you guessed it, the other will contain the wet ingredients. 


Now here's a little tip, which some of you may know, when making muffins, pancakes, cupcakes and anything of the like...it is a really good idea to whisk your dry ingredients. This aerates it and will make for a lighter finished product. This creates the same result as sifting your dry ingredients, but doesn't this seem way faster? 

You can go ahead and whisk together your wet ingredients also. This will make sure everything is combined real well. 

Next, stir your apples into your wet ingredients until they are well incorporated. 

Pay close attention to these next steps to ensure fluffy moist muffins!

Add half of your dry ingredients into your wet and give it just a few good stirs. Then dump in the rest of your dry ingredients. Gently fold these in just until everything is moistened. I cannot stress enough how important it is to not over-mix when making a batter! It really effects the outcome of your final product. 

Once combined, evenly divide into your lined muffin tin.  I spray mine with a little cooking spray just to ensure the muffins don't stick. I have never made these without doing it, so I honestly don't know if they will actually stick without the spray. 

Bake for 15-20 minutes until a toothpick inserted into the center comes out clean. 

And here they are again 

I even made some minis for my baby girl to enjoy. She loves these and I don't feel one bit bad about giving these to her because they're pretty healthy. 

*Note: Should you decide to make a double batch, do not double the recipe. You will have to just make the recipe twice, separately. I have just come to learn that baking is so finicky and not all recipes can be doubled...something about the science of it all. Don't worry, even if I knew the scientific explanation, I wouldn't dare bore you with that. 

Oh and just to do this right, here is the link to recipe I based mine off of: Carrot-Apple Spice Muffins


Also, if you can't already tell how fabulous I think these muffins are I just want to give them an extra ego boost by telling you this... a couple weeks ago I made these muffins and brought a couple in for some coworkers. THEY LOVED THEM, so I gave them each a copy of the recipe. One of them came back to me the next week and said she made some and shared them with her neighbor and one of her daughters and they both LOVED them equally as much. 

Have I fully convinced you to make these yet? 


Sunday, September 30, 2012

Greek Chicken Pitas

 First off I would like to say this is not an AUTHENTIC Greek dish...it is Greek inspired.
Greek Chicken Pitas
serves 4-6
Ingredients:

Filling-
1 lb ground chicken breast or ground turkey
1/4 cup grated zucchini
1 clove garlic, minced
1 tsp dried Oregano
4-5 fresh Basil leaves, torn into small pieces (or 1 tsp dried)
1 tbsp fresh parsley, chopped
1 lemon- half for cooking, half for dressing greens
1-2 tbsp Olive Oil + enough to coat saute pan
s & p to taste

Toppings-
6-12 cherry tomatoes, halfed- figure 2 per pita
4 oz Feta
1 bag of Spring greens
4-6 Pitas


Pour enough olive oil in your saute pan to coat it well, or any other oil you prefer.  Turn heat to medium high heat. Once the oil is hot, add in the grated zucchini. The zucchini will help to add some moisture to your ground chicken. Once that has just softened, you may add the ground chicken. Immediately season with a little salt, pepper, dried oregano, and minced garlic. If you are using dried basil and parsley, now would be the time to add it in.


Brown your chicken until it is thoroughly cooked. In the last few minutes of cooking you will add in your fresh herbs, basil and parsley, and squeeze the juice of half a lemon over it. 


Once the chicken is cooked through, dress your greens with the juice of the other half of the lemon and 1-2 tbsp of olive oil. You may season with salt and pepper if you like.

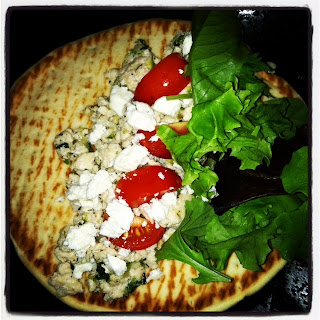
Top your pitas with ground chicken, feta, tomatoes and greens. Fold and devour!

***If your the type of person who really likes to have some sauce on your sandwiches and wraps, I would follow this suggestion. Instead of putting feta on on its own you can make a little sauce/dressing like so:

Mix 4 oz of feta with 1/4 cup mayo, 2 tbsp lemon juice, a pinch of Dill and a pinch of Oregano. Spread this onto your pita first, then top with ground chicken, tomatoes and greens.


Like I always say, if you try this recipe of mine, please leave a comment below and tell me what you think! Especially with this recipe, let me know what version you decided to try.


Tissue Pom Madness


Holy smokes, somebody help me! I might be getting out of control with these things. They are just to fun to make! So many colors and patterns in my collection (Only a few people know my unhealthy obsession with buying tissue paper just because it's pretty)...oh the possibilities.

You may be wondering how this madness even started. Well, Elise's birthday is coming up in just a little over a month and part of my ideas for decor is pink tissue pom flowers. I figured that since I never made one before, I ought to practice. Here's my very first one: It's a mini version and kind of wimpy if you ask me.
I've decided to just hang this little guy on one of Elise's drawers. 


So after I made this poor excuse of a poofy tissue pom, I decided I ought to make some improvements if I am going to make some for the party. 

This was my second one. Huge improvement if you ask me! 
This one is just sitting on top of a mini cake stand that I have on Elise's dresser. 
I think it fits her room decor well.


So after deciding how fun these were to make I made a couple more. I think the Zebra striped one will go in my office and the other I plan to bring to a co-worker for her desk. 

If you have possibly been inspired by these, check out the link where I found the greatest tissue pom tutorial.  She gives you measurements for all sizes and ideas for use! My favorite is the tiered hanging poms. These would be great hanging in a nursery or as I plan to use them, party decor!


Hopefully you don't get tissue pom fever like me ;)


Mmmm Fresh!


Delicious finds from the Farmer's Market.  Zucchini. Corn. Peaches. A pear (for Elise). 3 kinds of squash: butternut, spaghetti and acorn. Basil...oooh the sweet aroma! Beets with giant beet greens.
We love sautéed beet greens because they're a little sweeter than collard greens or chard. 

We also picked up this amazing sweet chili sauce that is made locally. It's similar to a tomato chutney with just a hint of spice. We imagine it will be great on burgers, or roasted turkey as a condiment. Or maybe even slow cooking some pork in it. Oh the possibilities. We may just need to stock up on a couple more bottles next time we go. 

Also not shown, fresh tomatoes of different sizes from a couple of neighbors. 

I get so inspired when we go to the farmer's market. It's so nice to cook with fresh veggies. 
Some of the dishes these great veggies will soon render themselves to: 

  • Homemade tomato sauce- fresh tomatoes and basil
  • Pizza Margherita- fresh tomatoes and basil again and that homemade sauce! 
  • Thai curry- zucchini and acorn squash 
  • Butternut squash gnocchi- butternut squash and basil 
  • Roasted spaghetti squash- I will tell you my trick for cooking this faster! 


I hope to provide you with several recipes for those listed above.  I have already started making my homemade sauce. I like to cook it low and slow, so I started it first thing this morning. I made sure to take several pictures! 

If you have a local farmer's market I urge you to support your local farmer's and treat yourself to some fresh fruit and veggies. Maybe I'm the only one, but I get so excited when I go. I'm like a kid in a candy store. 

Stay tuned for more recipes! 

Thursday, August 30, 2012

A Sort of Eggplant Parm

As promised yesterday, here is my recipe for a healthier version of Eggplant Parmesan. This will easily feed 2 hungry people or can be made as a side dish when serving 4. This recipe is so easy to tailor to how healthy you want it to be in that you may use more or less mozzarella cheese...heck, you could even skip it if you want. Although, it just wouldn't be the same :)

I promise it looks more appetizing in person ;)

A Sort of Eggplant Parm
Serves 2-4

Ingredients:
1 eggplant
1/2 jar of your favorite tomato sauce
1/4-1/2 cup shredded mozzarella cheese

Breadcrumb topping:
3 tbsp Panko breadcrumbs
1/2 tsp Italian seasonings
2 tsp olive oil
1 tsp grated Parmesan cheese

Slice eggplant 1/2" thickness.  Lay out on large plate or cutting board, sprinkle with salt and let rest for 3-5 minutes. This will help to draw out some of the bitterness in the eggplant. While you wait you can heat your grill or oven. I used our trusty ol' George Foreman electric grill for this. You may use a grill pan if you have one, a skillet or you can just roast the slices on a sheet pan in the oven.

* My second choice to the grills, would be to roast the eggplant in the oven at 425 degrees until the eggplant is tender. Unfortunately, I have not used that method before so I am unsure of the cook time. (You could just do what I would do and research it online). However, if you choose to use a skillet, I would suggest using a non-stick skillet. You will still need to use some oil in the pan to prevent it from sticking.

Also, while you are waiting, combine all ingredients for your breadcrumb topping (unless you've chosen to use store bought).

Once the eggplant has released it's yucky bitter juices, dab with a paper towel. Drizzle with olive oil and grill those slices for about 3-5 minutes. You want to grill them until they are nice and tender and have those yummy looking dark grill marks.


Coat a baking dish with a little bit of olive oil or cooking spray. I used a deep pie dish. Lay down a layer of grilled eggplant. Spoon on desired amount of sauce. If you'd like, you may even add a layer of cheese at this point. Continue to layer until you've used up your eggplant. Spread the last layer of eggplant with sauce, then sprinkle on cheese.

My new fave Marinara sauce. Smooth and sweet.  Try it!

Bake at 375 for 20 minutes. Then broil until cheese is bubbly and browned. Well, that's the way I like it anyway. You can skip that part if you're not a fan of that delicious, browned, crusty cheese like me!


Remove from oven and top with breadcrumb mixture. Broil again for 30-60 seconds until breadcrumbs and nice and crisp! I think mine could have gone a little longer.


Typically, this is served alongside spaghetti with marinara sauce.  I think I must have been craving veggies last night because I just served mine with some sauteed veggies. <Broccoli.Mushrooms.Zucchini.Spinach. Onion.Green Bell Pepper.Garlic.Dab of Butter.Montreal Chicken Seasoning.Italian Seasoning.> This is probably why it fed the 2 of us last night, we didn't have the carbs to go along with it.

As always, if you try this or any of my other recipes, please come back and leave a comment. Tips, questions or constructive criticism is all welcome! And please, share this link with your friends: Dinner and a Craft

Reversible Car Seat Straps

Well folks, here it is... my very first craft. And here I am lacking good pictures. Sorry guys! I should have done some step by step pictures, but honestly, I was so excited to make these that it just slipped my mind. But, it's ok, I will be referring you to the site that has the tutorial and plenty of pictures (much better than mine too).  I will also take a picture tomorrow in the daylight of the straps in Elise's car seat. 

I don't know why, but I just absolutely love these things. I think they are so fun and super easy to ship together (nice for a beginning sewer as myself). You can use any fabric you choose. The first set I started with were minky, and well as it turns out, minky is a challenging material to work with. So I scrapped that and went for flannel. I was so excited when I found the flannel print with the birds because my mother-in-law made Elise a car seat cover with the same colors and a bird on it as well. I love it when things match! 

So here is the free tutorial, from a blog called The Sweet LifeSimple Reversible Car Seat Strap Covers. (There are 2 links here... the first one takes you to the home page and the other to the tutorial itself). 

To you mommies (or mommies to be) of young ones, give this tutorial a try. They are a little blessing for babies. I used to notice Elise getting red marks on her neck from her car seat straps. And hey, even if you aren't a mommy or expecting, these make great gifts. I gave a set just like this to my sister-in-law and am sending another set to one of J's friends wife. In fact, I am just anxiously waiting to find out what 2 other friends are having so I can make them some as well! 

Lastly, I hope you enjoy making these yourself. 

Thursday, August 2, 2012

Tacos Frescos


Ok, blah, I failed at posting a craft next. But here's the thing, I had time to post this real fast and I wanted to do so while it was still summer because they are so fitting for the season.

These tacos are so light and refreshing. Great for a light lunch or dinner on a hot summer day. I know my husband personally doesn't enjoy a heavy meal for lunch or dinner after working a long day in the heat. I made these last summer when I was pregnant and trying to make sure I ate healthy. Although, to be honest, that went out the window probably around 6-7 months when I started eating Cheetos on a weekly basis. Maybe not quite that often, but I did still make sure to eat healthy meals in between those naughty treats.

Serving size 2

Chicken:
2 chicken breasts, diced
1-2 cloves garlic
4 sprigs cilantro, remove stems and rough chop leaves. Set aside half to top tacos
1/4 cup diced red onion
approx 1/4 cup lime juice, I use the stuff in the bottle so not sure how many limes that is
1 tbsp lemon juice
1 tbsp olive oil
ground sea salt and pepper (1-2 turns in your grinder)

Combine all ingredients in a bowl. Cover with plastic wrap and let marinate in the fridge for 20-30 minutes while you prep other toppings for tacos. You shouldn't marinate this any longer because the acid in the juice will start to break down the meat.

(Not the prettiest shot)

Heat a large skillet on medium heat with a little olive oil and cook the chicken until cooked through. Do not add the marinade into the pan. It's ok if any garlic, onions or cilantro make it into the pan though. If you would like, you can add some more lime juice.


Toppings:

1 medium vine ripe tomato
1 ripe avocado
1 can black beans, optional


While the meat marinates, slice or dice your veggies. Heat your black beans while you cook the chicken.

Place all ingredients onto warm yellow or white corn tortillas.

As you can see in the first picture, I served a radish and cucumber salad along side the tacos. It fulfilled my need for something spicy and cool. Here is how I threw it together:

1/2 cucumber, peeled
4-6 radishes
1 tbsp white vinegar
1 tbsp water
2 tsp white sugar

Cut the half of your cucumber in half again, lengthwise. Then slice cucumber and radishes. Whisk vinegar, water and sugar in a small bowl. Combine all ingredients in the bowl.  If you prepare this first and let it sit in the fridge while you make everything else, it will allow time for the dressing to absorb and concentrate.

As always, if you try this recipe or any others, please send feedback. Most importantly, ENJOY!


Power Breakfasts- Oatmeal

Wow, it has been quite some time since my last post. My apologies. Since our preparing and moving to TX for the summer, and between getting a puppy and watching after a crawling baby that is learning to explore everything she finds, I have just not found the time to post on here. And I promise, I will get some crafts up ASAP. I will vow that my next post will be a craft of some sort.

This is the beginning of several "cleaner" recipes you will find on my blog. I have decided that once we return to UT later this month, I plan to purge our kitchen. There will be a few things like condiments that I will keep on hand though. Most everything else will be either less processed or not at all. Along with this, I have come up with some healthier recipes for you all. Some recipes inspired from various sources. I will also provide some cleaner or healthier alternative recipes for common things like, Eggplant Parmesan or enchiladas (keep an eye out for these in the near future!)

But first I will start out with the most important meal of the day. Breakfast! The right way to start out your day is a nice big glass of water within 20 minutes of waking and a nice hearty breakfast to give you the energy your body needs. (tips from http://mikfit.blogspot.com/2011/06/quick-tips-primarily-for-breakfast.html)

I'm not sure how popular oatmeal is for breakfast. I assume a lot of people like the convenience of those flavored instant oatmeal packs. Don't get me wrong, I have used those plenty in the past. And my way of making oatmeal back then was a generous amount of brown sugar and some milk or soy milk. But now it's time to move forward and onto better things. Let's take the time to fuel our bodies properly. You only get one body so you ought to treat it as a temple!

I'm going to give you some delicious, healthier ideas on how to prepare your oatmeal (and I'm not talking about the instant stuff).  First off, start with either rolled oats ( I prefer Quaker's Old Fashioned oats. I would also recommend Bob's Red Mill.) or steel cut oats. I know a lot of people are partial to the rolled oats, but give the steel cut a shot. It may take some getting used to or you may find that you prefer them over the rolled.

Follow the directions for cooking with water but omit the salt or use a little less than it calls for and use ground sea salt instead.

Here are some suggestions on how to sweeten your oatmeal:

  • Real fruit nectar- I prefer Kern's Peach or Pear.
  • 100 % apple juice- Something like Simply Apple, Santa Cruz Organics or anything you find similar. Skip juice brands like Mott's or Tree Top. 
  • Stevia 
  • Banana
If you are using juice, you may either use half water and half juice/nectar during cooking or you may just add in a bit to your bowl. 

Yummy additions: Combine any of these to liven up your oatmeal. 
  • Dried cranberries or raisins (add these in during the last couple minutes of cooking so they plump up)
  • Dried fruit of your choice
  • Diced apple (cut these about the size of a raisin and add in during the last few minutes of cooking)
  • Fresh berries
  • Berry sauce- I take  frozen berries (any mix you like), put them in a pot with about enough water to come up the berries half way and let them simmer away until them become soft and there is a bit of a syrup with them. Perfect on the steel oats!
  • Ground flax 
  • Walnuts, almonds, pecans, or any nut of your choice (unsalted! raw or roasted)
  • Cocoa powder (not the kind you use for choco milk or hot coco)
  • Cinnamon
  • Mapleine (Maple flavoring)- If you're like me and love adding brown sugar, and loads of it, to your oatmeal this is a good alternative. This way you still get the mapley flavor, just add juice to sweeten. Also, you will want to use just a drop at a time until you reach the desired flavor. This stuff is strong! You can find this on the spice isle of your grocery store.) 

I also love to add some kind of creaminess to my oatmeal so I like to add soy milk.  You can use milk or an alternative of your choice. Anything from soy, almond, hemp, rice or coconut milk is great. Maybe even opt for unsweetened if you can.  

Here are some of my suggested combinations:
  • Cocoa powder, walnuts, banana and soy or coconut milk
  • Banana, cranberry, cinnamon, almond milk
  • Peach nectar, cinnamon, golden raisins, ground flax, soy milk
  • Apple juice, apples, cinnamon, Mapleiene, rice or almond milk
  • Cocoa powder, raspberry sauce, apple juice, soy or coconut milk
*Just a side note, I use about 1/4 cup as a serving size for myself. Often I will pair my oatmeal with a small green smoothie or a piece of toast with PB and Chia seeds*

There are so many possibilities to make that bowl of oatmeal more nutritious and keep it just as tastey. 

Remember, oatmeal is full of fiber and anti oxidants. It is suggested to pair your oatmeal with a glass of juice loaded with vitamin C (if you know me, I HATE orange juice, so this is why I did not say "a glass of OJ") to help aid in keeping your arteries unclogged.  

As always, let me know how my recipes or suggestions work for you. And if you've decided to jump onto the train of cleaner/healthier eating lifestyle, let me know. 

Also, If you need meal ideas before I am able to post some, feel free to contact me. I have recipes written down that I am yet to prepare and take pictures of for you all. 

Saturday, February 18, 2012

The best salad you ever had with salmon...

...Ok, that's a bold statement, but I will say that this salad definitely compliments salmon very well.
After the recipe for this salad I will give you a quick recipe for my favorite way to prepare salmon. 

Asparagus and Roasted Red Pepper Salad

1 pkg baby spinach 
1/4 cup roasted red peppers, diced
4-6 mushrooms, thinly sliced
10-12 spears of asparagus, sliced on the bias into 1" pieces 
2 tbsp crumbled feta (or more if you like)


Dressing: (if you don't want to make this dressing, a champagne vinaigrette would go well with the salad)
2 tbsp olive oil
1 tbsp lemon juice, freshly squeezed
1 tbsp rice wine vinegar, or white wine vinegar
1/2 tsp dijon mustard
1 small clove garlic, crushed
1/2 tsp sugar
1/4 tsp dried parsley


Drizzle about 1/2 tbsp of olive oil into a medium saute pan.  Cook the sliced asparagus on medium high heat.  You want the asparagus to brown on the outside so don't stir them too much.  While the asparagus is cooking, slice your mushrooms and make your dressing.

Once the asparagus is browned and tender, begin to assemble the salad.  Put the baby spinach in your serving bowl.  Top with roasted peppers, sauteed asparagus and sliced mushrooms.  Then drizzle on dressing to your preference and top with crumbled feta.


Baked Salmon and Tomatoes
Serves 2


1 lemon, sliced in 1/4 inch rings
2 salmon steaks or fillets
2 medium tomatoes, 1/4 inch slices
1-2 cloves garlic, crushed
3 basil leaves, fresh or 1/4 tsp dried basil
1/2 red onion, sliced in rings
salt and pepper to taste

Coat a glass baking dish (any size that will hold your fish) with olive oil.  Lay down slices of lemon, then lay fish on top of lemon slices.  Drizzle fish with a little bit of olive oil as well to help keep it moist.  Then season with salt, pepper and crushed garlic.  Next alternate laying slices of tomatoes and onions on top of the fish.  Season with more salt and pepper.  If you are using fresh basil, cut basil into strips.  Sprinkle fresh or dried basil over onions and tomatoes.

Bake at 350 degrees.  The time will vary on the thickness of your fish.  I would give it 8-10 minutes per inch of thickness.

When serving, do not serve with the cooked lemon.  Serve a fresh wedge with each piece of fish.


Monday, February 6, 2012

Shrimp Mac N Cheese

Behold, the ultimate comfort food at it's finest.  This cheesey, gooey, seafood pasta delight is sure to wow your taste buds.

(Just a little side note, I regret not taking a photo of this dished up on a platter. But, you get the idea.)


Shrimp Mac N Cheese
serves 4 

8 oz Macaroni noodles
1 tbsp butter
1 tbsp flour
1/2 tsp garlic powder
1 1/4 cup milk 
1/2 cup heavy cream 
1 cup sharp cheddar cheese, shredded
1/2 tsp "Better than Bouillon Lobster base" 
1/2 cup pre-cooked shrimp, chopped
2 tbsp good white wine (for those who cook with wine)

Topping:
1/4 cup Panko breadcrumbs 
1 tbsp butter, melted
1/2 tsp dried parsley 
1/4 cup sharp cheddar, shredded 

In a large pot, cook pasta according to package directions.  You can do this will you make the cheese sauce.

To make the cheese sauce:

Start off with making a roux (clink link for "how-to"). Stir in the lobster base and then whisk in the milk slowly until you notice it start to loosen up.  At that point you can go ahead and dump it all in and then add your heavy cream.  Make sure you're whisking the whole time to avoid lumps of flour. Season with salt, pepper, and garlic powder. If you choose to use white wine, this would be the time to add it in.  Once the mixture comes to a boil, turn off heat and stir in 1 cup of shredded cheese. 

Ladle some cheese sauce into the bottom of your loaf pan, about enough to coat the bottom. Next, fold the chopped shrimp into the remaining cheese sauce. Pour half of the noodles into the loaf pan, then half of the cheese sauce and repeat.   Give it all a good stir until the noodles are coated with the sauce. 

In a separate bowl, combine breadcrumbs, melted butter and parsley.  First sprinkle the shredded cheese onto the macaroni dish and then the breadcrumb topping.  Bake at 350 degrees for 30 minutes.  Then set under the broiler to crisp up the topping and edges until it starts to brown.  Watch this closely so that you don't burn the top. 

Since this is a fairly rich dish, I would suggest serving something light along side it.  A nice salad with some citrus elements will help cut the rich cheese sauce well. 

ENJOY!

Please leave a comment below and tell me what you thought of this dish.  Did your dinner guests enjoy it or have any complaints? Constructive criticism is appreciated. 


Tuesday, January 31, 2012

Better than Buillon

A few years back a friend of mine introduced me to this wonderful food product.  It truly lives up to its name... it IS better than bouillon. The base is super concentrated which makes this product go a long way and worth every penny. 
Better Than Bouillon comes in a large assortment of flavor bases as well as a variety of options such as organic, kosher, and reduced sodium. You can find the basic flavors like chicken, beef and vegetable in most grocery stores. If you are unable to find the more unique flavors like clam, lobster or mushroom, go to the link that I have provided above and order a jar today! 
I really urge you to purchase this product. I would even suggest having a variety of flavors on hand. This product is so versatile, you won't regret following my advise on this one! 

Monday, January 30, 2012

Roux: What is it?

Yes, my first post is about roux.  Reason being, not many amateur
cooks know about this wonderful mixture.  So, I would like to
enlighten those lacking this knowledge.  Once you learn of its
purpose, the uses are nearly endless.  Without a doubt, I will post
multiple recipes using this concoction.

Roux, pronounced: roo, is a mixture of flour and fat…generally BUTTER!

This mixture is used as a thickening agent, much like cornstarch.  So
what can you use it to thicken?  Gravy, soups, sauces, stews…etc.  My
favorite use is a sauce called béchamel or white sauce.  You’re
probably also wondering what that is.  Well, let me introduce you to
this wonderful “mother sauce”.  It all starts with roux and ends with
milk, and that’s it.  It’s a thick white sauce which can be used in
lasagna or as a base in itself for sauces such as Mornay (cheese
sauce).  Which brings me to give you a little teaser on my next
post… what greater purpose for a Mornay sauce than mac’n’cheese?!

Ok, back to roux. How to make it: In a pot/pan combine equal parts
flour and fat. I.e.1 tbsp flour and 1 tbsp butter or oil. Melt your
butter in the pan first, before adding in the flour. Now the cook time
all depends on what you intend to use your roux for.  For a white
sauce, you will only want to cook your roux for about 1-2 minutes.
This is just enough time to cook the flour and remove any raw taste.
For a brown gravy or dark stew, you can cook it until it becomes the
color of peanut butter before adding in your liquid ingredients.  For
either purpose, make sure you are almost constantly stirring the
mixture to keep it from burning.

When creating a sauce from roux, remember to use room temperature
liquid and whisk it in slowly at first, then once the sauce begins to
loosen, you can just dump in your remaining liquid.  The reason I
mention this is when you first start adding the liquid, you will
notice its still paste like.  As you continue to slowly add the
liquid, while whisking, it will begin to loosen and become more of a
thick sauce.  In order for your sauce to reach its full consistency,
you need to bring it up to a boil.

Well, I think that about covers what I wanted to tell you about roux.
If I missed anything or you have questions about this, please post a
comment below.