Blog Background

Saturday, June 22, 2013

Showing Off Some Recent Sewing Projects

Earlier I started a post about some fun things I have been sewing up the past few days. But then I realized that I need to take some better pictures before I can actually post that one.  

Somehow this week I have found lots of free time to actually sew and make some fun stuff. It may be because I am finally slowing down a little on trying to prepare the house for the new baby and working myself to the ground. I decided that I am going to take these next couple of months a little easy and do some things I enjoy. 
My second pregnancy has been a lot more rough on me than the first.  I have seemed to developed carpal tunnel on my right side and my sciatica is worse than before. Just to name a few things. I know sewing isn't exactly taking it easy on my wrist, but I just found my wrist brace and promise myself I will wear it. Haha.

These are just a couple of projects that I have made that I did not use a tutorial on so this won't be a very detailed post. If you have any questions on how I made any of these, leave a comment below. 

This first little creation is just a pouch that I originally attached with sticky velcro onto the back of Elise's high chair.  I plan to store some bibs in there for quick access. Last night Elise ripped the pouch right off, both sides of the velcro and all.  Fortunately for me, I just bought some awesome fabric glue the other day.  I just glued that bad boy on last night and tested it out this morning. The pouch now functions as it should.  I also decided this morning that I should probably try to attach a button and loop to help keep this thing shut and hold the bibs in. 

I pretty much felt like a genius when I came up with this idea for storage.

I also made this little do-hickey... I have no idea what to call this... it basically just ties around the 2 door handles and makes it so you can open and close your child's door quietly when they are sleeping. Ta-da! 


Last is this nightmare of a creation in progress...


 Here's why it's been a headache of a project:

I originally bought this material to make a small tote for a friend's daughter.  Then I realized that I did not order enough fabric for the tutorial I was going to use.  Turns out that since both fabric prints are directional, I could not use that tutorial. So I looked through my Sewing Board on Pinterest to find an easy tote tutorial.  I came across this one Color Block Tote and thought, "heck yes, this will be easy and perfect". 

Well, once again, I did not check the final measurements of this bag and after sewing the basic bag together I realized, "Oh my gosh, this is way too big for even a tall 6 year old".  I was devastated b/c I really wasn't sure how to go back and fix this. I sure as heck wasn't going to spend a good 30-40 ripping seams and then trying to reconfigure this. 

My solution was I would fold the upper half in and that would make it less tall.  Then I figured she could use it as a beach bag.  I was going to skip the part in the tutorial of inserting a liner, but then realized that this bag is too floppy without one and I will now somehow have to figure out the new measurements for the liner... and find some fabric for it. 

I really wanted to make an inner pocket for the bag...since it would now be a beach/pool bag.  I sewed one up with some leftover fabric pieces. I then realized I had no idea how I would attach this pocket to the bag without having random stitching showing on one side of the bag... so I DEFINITELY have to make a liner for this and figure out how I will attach it to the liner. 

I then pinned on my straps, and the inside pocket.  Tried the bag on for size... yeah, definitely still too big for a 6 year old. So, last night I finally decided to put the project on hold for now to give myself a break from the frustration.  
I seriously spent the better part of my day working on this thing.  I just kept running into problems with this thing and would think that I found the solution but then something else would come up. I will eventually finish the bag and probably end up gifting it to someone else and go back to my original tote pattern for the 6 year old and pick up different fabric. 

So here is where it stands right now: 
It measures 18" W 16" H 
Now I just need to think of someone who likes giraffes?! LOL 


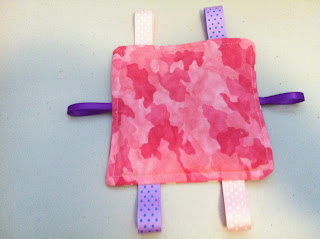
Baby Crinkle Tag Toy


Found myself with some more free time this morning, so I hopped onto my Sewing Board on Pinterest and decided to browse for an easy project that I could make with either material I have on hand or some scrap material.  I came across this little Baby Crinkle Square from Joy's Hope that I thought I would try out. 

This was so easy to make that I think I will have to make several of these. Luckily, I know quite a few ladies who have just had babies or will be having babies very soon that I can make these for. 

I made mine with one side of flannel polka dot and the other was pink camo cotton quilting fabric. This is an awesome thing to make with scrap material. I only had a couple of colors of wide ribbon and I wanted to tie in some more purple so I added some thinner ribbon. I think for the future I will stick with all wider ribbon. 

For the inside crinkly layer, I used 3 6x6 pieces of Cellophane that I have. Glad I found a use for this stuff b/c I bought a large roll of it for Easter and didn't know what else to do with it.  

 It's perfectly crinkly! 
Here's the reverse side.

Friday, May 17, 2013

Homemade Baby Gifts


Home sewn baby gifts galore for baby boy Ramirez

 Burp cloths along with matching car seat strap covers.  You can refer to my previous post about the strap covers, that I think are brilliant, HERE.
I also made a matching bib in this set. Here is the link to the burp cloths shown in this set: The Best Burp Cloths

 This is a look at the 3 bibs in the other set. 

 ...and just so you can see what they look like when they are opened up. I think these are my fave b/c the hug around your neck when they're over your shoulder. You can find the tutorial for these at: Cloud9Fabrics
 Last is this little gem. I made my first receiving blanket. Let me just tell you, I cannot cut a straight line for the life of me. Part of the reason probably is that I don't have a large enough cutting table. Fortunately, the end result was not TOO crooked. I also had a hard time making the rounded edges them same...but hey, IT IS my first time afterall. Maybe one day I will perfect these. 

As you can see, I did a sweet monogram with the alternating fabric that I chose. The perks of having a Silhouette cutting machine! Unfortunately, it was a bit hard to get it to stay on with just ironing it, so I had to also do a stitch around it. It would have probably looked a little more fun if the "fancy-stitch" setting worked on my machine, but sadly, it does not. 

If you would like the tutorial on this simple receiving blanket you can head over to Stay-At-Home Artist's blog. (You will notice that my corners look nothing like hers. Oops.) 

Pirate Quilt for Baby Ramirez

Arrr Matey, a Pirate Quilt it be! 
(don't mind my daughter's tiny foot in the background)


To start off, here is the link to where you can find the pattern for this quilt. I was fortunate that my awesome mother-in-law had this pattern already and I made a copy of it for myself. 
The pattern is called San Francisco Window Boxes

For those of you who may not know this already, this is only my second quilt. I found that this pattern was very easy for a beginner like me. Despite the number of times I had to rip out some seams. I believe that was due to my lack of paying attention to some things. I highly recommend this pattern for anyone starting out. It's simple and I think it is a really great way to display any awesome fabric line you have discovered.
 I personally fell in LOVE with this collection by Riley Blake called, Pirate Matey's. Wishing we were having a boy so I could make a million things with this fabric! 
 

Here are some progress pics:


 I love playing around with how to match up the fabrics. I am such a stickler with things having to match a certain way.


Here are the strips all put together...just need to add on the border pieces.


Sadly, one thing you will notice that I ended up not doing on this quilt is the outer border with the patterned fabric.  I ran into a couple of issues and tried to mend the situation, but it just didn't work out. So I ended up just ripping off that outer border and leaving it with just the white border.


Here are a couple of the finished product. I sent it to my mother-in-law to quilt for me and she picked the perfect quilting pattern for it. I used plain black fabric for the binding and get this...


for the backing, I used a dark blue micro fiber plush throw. I got this brilliant idea from J's mom and grandma. This tends to be much cheaper, especially for larger quilts. It also makes them extra warm. What a genius idea! 

I think this quilt turned out to be a great size for a baby quilt, and although he got it just before summer, it will definitely last through a couple of summers. 


Thursday, May 16, 2013

Balsamic Chicken Bruschetta


I don't know about you, but my mouth is just watering looking at this picture.  I'm already thinking about making this again for lunch tomorrow. 

Now for those of you who have not tried Bruschetta [bru-ske-ta], it is an Italian antipasto that generally consists of grilled bread rubbed with garlic and olive oil then topped with something delicious.  Most often seen is a mixture of fresh diced tomato, basil, olive oil and garlic. Variations of that include balsamic vinegar or some sort of cheese. 

For me, this dish just screams warm summer nights. I'm thinking about how much I cannot wait for fresh tomatoes and basil from my garden.  I actually have a pretty decent sized basil plant right now and was able to use it for this dish. Sadly I had to use store bought beefsteak tomatoes tonight. Nothing beats tomatoes straight from the garden though. I just remember, as a kid, picking them off our tomato plants in our small garden and devouring them like an apple. No salt or anything. 

Ok, I'll stop boring you about tomatoes.  A little background on how this dish came to be... 
my husband is on this new diet (I attempted but lasted 1 week and decided as a pregnant girl, I don't need to be dieting to lose weight. That comes post-baby. We'll try again later) Anyway, since I am trying to avoid making 3 different meals, I am making dinners that fit within the terms of his diet and are still satisfying to me. I typically improvise the meals I make and was trying to think of what we had on hand right now. I knew I had to make some chicken...but didn't want it to be the usual boring baked chicken, veggies and beans. We had several tomatoes on hand that needed to be used up and I was trying to rack my brain on what on earth I could make with chicken and tomatoes. I then remembered we had loads of basil on our plant. I immediately thought, I'll top some grilled chicken with that tomato, basil, garlic mixture.  I didn't stop there though...you'll see in the recipe to follow. 

 Anyway, J can't eat bread so he got to just eat the chicken with a side of mixed greens.  I, however, made this into a very satisfying sandwich with some toasted sourdough. When you make this, feel free to try it either way... or heck, throw those mixed greens on your sandwich. 

On another note, this is a dish that is super easy to make for 2 or to feed a crowd.  You can choose to grill this on an indoor grill pan, outside on the BBQ or in just a regular saute pan. I will tell you exactly how I made it for 2 so you can see how quick and easy this is to throw together... then you can tailor it to the number of people you wish to feed. 

Ingredients: 

Tomato Topping:
1 lrg Beefsteak tomato, or 2 medium Roma tomatoes (ideal b/c they have few seeds)
5-6 Basil leaves 
1 clove garlic 
1/2 tbsp olive oil
pinch of sea salt

Balsamic Chicken:
1 lrg chicken breast
1 tbsp good Balsamic vinegar
1 tbsp Tuscan Herb olive oil (this is where we got ours: Mountain Town Olive Oil) or any other herb                           infused olive oil

First you will want to prep your tomato topping to allow the flavors to come together. The further in advance that you make this, the better it will taste. 

Dice your tomatoes to whatever size you prefer. I did about 1/4" I believe. Toss these in a bowl with salt and the olive oil. Finely mince your garlic, or use a garlic crusher like I did. The finer the better so you don't end up eating huge chunks of strong garlic. Chiffonade your basil (see how HERE). Lightly toss these ingredients in with your tomatoes. Place your bowl in the refrigerator until you are ready to serve. 

Heat your grill pan or saute pan on Med-high while you prepare the chicken.  Make sure to lightly drizzle some olive oil in your pan. 

To prep your chicken, season both sides well with salt and pepper. Since I planned to make a sandwich with mine, I cut the chicken breast in half then I split that by cutting through it like you would a bread roll but without going all the way through. That is the best way I can think to describe it. You basically want to be able to fan out the chicken breast. This also allows for a quicker cooking time. 

Next, in a small bowl or cup, mix together your balsamic vinegar and herbed olive oil.  

By now your pan should be hot and ready.  Turn the heat down to medium and place your chicken in the pan and then drizzle half of the vinegar/oil blend on top of the chicken.  Let that cook for 3-5 minutes then flip to cook the other side. Pour the remaining vinegar/oil blend on top of the chicken.  If you split the chicken like I did, it should take another 5-8 minutes. 


If you are going to make sandwiches with this, you will want to toast your bread during the last couple of minutes of cooking.  Ciabatta rolls or sourdough are ideal for a sandwich.  Prepare any other toppings, like lettuce, if you choose to add anything else to your sandwich. 

Once the chicken is cooked, top with tomato/basil mixture and serve as you wish.  When I made my sandwich, I just put a little mayo on one slice of bread to moisten it, placed my chicken on that piece...topped it with the tomato/basil topping then drizzled on a little balsamic vinegar and pressed on my other slice of bread. 

I will be completely honest with you when I say this.... I DEVOURED that sandwich. I don't even know how I managed to taste it...but I did! And it tasted AMAZING (in case I didn't mention that at all earlier...shame on me if I didn't.)

Also, a little secret, I saved some of that tomato basil topping for toast w/ cream cheese tomorrow! 

Like I said earlier, this is a pretty quick meal with a high flavor reward. I think you will really enjoy this one. As always, please leave me a comment if you try out this recipe. Your feedback means a lot! 


Sunday, March 31, 2013

Ground Chicken Tacos w/ Mango Salsa

Tacos, Mango Salsa and Avocado Lime Sauce
Yeah, I forgot to take a pic before the first few bites. LOL. Please forgive me! 

Confession: This is what we had as our Easter dinner this year.  I know, not your traditional ham and mashed potatoes dinner ...but it was really nice to have a light healthy dinner today. Especially after all of the Easter candy we've been consuming almost all week. These may not look like much, but all of flavors in this taco compliment each other so well. They were such a hit that my husband ate 4 of them (which he admitted was the most tacos he's ever eaten in one sitting.)

Ok, first off I would like to admit that my main reason for this post is to show off the Avocado Lime Sauce that I made for these tacos. I was so impressed with myself, I thought I should share the recipe with you all.

Second, I almost would've made these tacos with shrimp instead if we had some on hand. If you decide that's what you'd rather do, I will include a note at the bottom on how to prepare the shrimp best to go with the rest of the ingredients in the tacos. Although, honestly, the ground chicken was still great!

I suggest that you start off with making the salsa. You can even make it hours to a day ahead. The longer it sits, the more the flavors will develop and come together.

Mango Salsa:
1 ripe mango, diced
3 roma tomatoes, diced
1/2 tbsp red or white onion, finely diced
2 tbsp cilantro
juice of 1/2 lime
pinch of salt
1/4 tsp sugar
1/2 JalapeƱo (optional and you can adjust according to how spicy you want it)

Next, prepare the Avocado Lime sauce. Once prepared, place in the refrigerator until you're ready to serve.

Sorry, I totally failed at capturing the glory of this delicious sauce. 


Avocado Lime Sauce (for tacos):
1 1/2 ripe avocado
4 tbsp Greek yogurt
juice of 1/2 juicy lime
1 tbsp chopped cilantro
1 pinch sea salt
1 very small clove garlic or 1/2 of a reg clove
1/2 JalapeƱo (optional and you can adjust according to how spicy you want it)

Combine all of the ingredients in a blender and blend until smooth. I used our Bullet blender.

Taco Meat:

1/2-3/4 lb ground chicken breast (or turkey if you can't find ground chicken)
1 clove garlic, minced
1/2 tbsp onion, finely diced
1 tsp ground cumin
1/2 tsp chili powder
1/2 tsp garlic salt
1 pinch each cayenne pepper and ground black pepper
*you can also use taco seasoning from the store*

Drizzle enough olive oil to coat bottom of saute pan.  On med-low heat, saute onions and garlic until soft. Once softened, turn the heat up to med-high and add in the ground chicken. Immediately add seasonings to the chicken. Don't stir right away because you want to brown the chicken. Cook until the chicken is cooked through and browned. You may want to test a piece once it is cooked through to make sure the seasoning is right. (I suggest you do this with just about everything you cook/prepare.)

As for the taco shells, I used flour tortillas and baked the shells over the rack in the oven.  Just fold the tortilla over one or two of the grates on your oven rack and then turn your oven on to 350 degrees. Bake 8-12 minutes, depending on how crispy you want them.

To assemble, spread avocado sauce on taco shell, then layer meat, shredded cheese (jack, pepper jack, or Cotija would be great) and mango salsa.

Enjoy these easy but flavorful tacos!

            ************************ EXTRAS ******************************

Here are a few ideas that you can also use the Avocado Lime sauce for:
  • Use as an enchilada sauce- you will need to double or triple the recipe, depending on how many you are serving. You are welcome to thin the sauce a bit with some milk or water if you feel necessary. *I may be making these soon and will be sure to show them off when I do*
  • Use as a salad dressing for a taco salad- thin out the dressing by adding 1 tbsp water/milk at a time until desired consistency is reached. 
  • Serve as is for dipping tortilla chips into


Citrus Shrimp:
Makes 8 tacos

24 raw, peeled and deveined shrimp

Marinade-
1/4 cup fresh OJ or good quality OJ (I prefer Costco's OJ)
1/2 tsp lemon zest
Juice of 1/2 lemon
2 garlic cloves, finely diced
1 pinch salt 
1 pinch cayenne pepper

Marinate the shrimp in a Ziploc bag for up to 1 hour, making sure to remove as much air from the bag as possible.

Drizzle enough olive oil in a large saute pan to coat the bottom evenly.  Heat your pan to med-high heat and saute shrimp. Make sure not to overcrowd the pan.  You will want to cook each side 2-3 minutes until pink.

Serve 3 shrimp per taco. 

Thursday, February 28, 2013

A Baby Shower- Baby Girl Butler

"You Are My Sunshine"

This is where it begins...the invitation. (side note: I could've sworn I took a lot better of a picture than this, but when I looked through my pictures, this is all I had. Sad day!)
Now, I am fortunate enough to have this amazing husband who bought me this glorious cutting machine called Silhouette Cameo. <click the link to check them out> I could go on and on about why this machine is one of my favorite inventions, haha. I will just tell you a few things for now:
  1. Not only can you cut paper but this little gem also cuts vinyl, fabric, adhesive labels, and it also prints for smaller projects.  
  2. You can cut out stencils for ink stencilling onto fabric, or you can cut fabric with the fabric interfacing, and you can cut out heat transfer material...thus, you can design just about anything you want to transfer onto fabric or clothes. 
  3. All of the designs are done on your home computer which will also use the fonts that you already have. No need for expensive cartridges for every little project! They also have a HUGE online store for designs that you can purchase, and most are only $.99! AND, every week, there is a new FREE design of the week for you to download! Score!
Ok, enough about the machine and more about my creations.  For the baby onsie I used this design. I then separated out the pieces and just used one of the onsies, made it just big enough to fit into my envelopes and then filled it in with my wording.  I first printed out the words with this super cute gold sparkle (which was more yellow and even more perfect since the party colors were pink and yellow), then I cut out the shapes.  I know it's a pretty simple looking invite, but a lot of the girls loved it.

I also cut out pieces for a banner with this same shape. Added some simple circles in the middle and the letters to spell "BABY". Here are the pieces and the finished product which I hung with clothespins and line.


I know you can't see the lettering in this shot, but I wanted to show that we hung this near the entryway with the party favors and clothespins for the "Baby Word Game".

It looks like I am starting out with the decorations so I will show you my next banner. (then we'll get into the yummy food and some fun baby shower games)

Here is a shot of it where you can see the letters the best. This is when I finished it at home. This is a more simple banner. I used my machine to cut out circles with a scalloped edge then cut out the letters.  Used some double sided sticky tabs to stick the letters on. Hole punched a couple holes in the top (I have found this is the best way to do it vs. just one hole) then threaded it through some matching ribbon. Between each circle I tied on some white/cream tulle to give it a little flair. You could also add on some wire ribbon along with the tulle (I didn't think of this until it was too late).  
I know you can't see the letters in this, but this just shows you how I hung the banner behind the food table. I added some tissue poms to hide the pins I hung the banner with. I used this same trick on the banner I made for Elise's party. In fact, yes, those are the same exact tissue poms. They were hanging in Elise's room so I just borrowed them from her. haha.

In a picture to come you will see framed: Tori's ultrasound picture and another piece of subway art I created on the Silhouette that says "You Are My Sunshine"
Next are the favors and prices I put together:

Here are the prizes I put together. 
  1. Candy Shaped Washcloths. Here is the link to the tutorial. The only thing I did different was use adult washcloths so that the girls that won them could actually use them. 
  2. Next are just body poofs. You know, those little mesh spongey things we girls love to use in the shower. I just wrapped those in some pretty cellophane and tied them with cute ribbon. This is what I had attempted to do but failed miserably... "Cupcake" Favors. I obviously gave up and went for something not as cute. 
  3. Last was  just a mini bottle of Bath and Body Works' Sweet Pea hand sani. 
Here's one of the favors I made. I will post a separate easy tutorial on how to put these together. Not that I don't think you could figure it out on your own...but just in case. 

Alas, the food!


The menu: (as you can see on the table, I also made labels for the food on the table)
  • Veggie Tray with dip (from Costco)
  • Quiche Lorraine and Spinach w/ Artichoke Quiche (I had originally planned on using mini quiche but Costco was out, so I got 2 full sized quiche in one pack from Costco)
  • Lemon Creme cookies
  • Raspberry Lemonade Punch- 1 or 2 cans frozen raspberry lemonade, 2 liter Lemon/Lime Soda or one of those jugs of Lemon Lime soda that are bigger than a 2 liter, 1 regular tub of raspberry sherbet. Float some cute little mini rubber duckies on top! 
Fondue Station Menu:
I made this sweet little sign stand (easel) with my Silhouette. I think I will be using that design a lot in the future. The sign I just used a border punch on a piece of cardstock and stuck on the menu I printed from my printer. 

Last are the games. I so wished I had taken some pictures of the ladies playing them. I think overall everyone enjoyed them. 
  1. Blindfolded Diaper Change- 
    1. To prep: Put diapers on some stuffed animals/dolls and bring an extra diaper for each pretend baby. Bring enough bandanas to use as blindfolds for each girl. 
    2. The game: Put the girls in teams of 2. Have them all sit on the floor, as this is the easiest way to do this.  Place a diapered pretend baby in front of them and give them their extra diaper. Then blindfold all of them. The first girl will need to remove the diaper from the pretend baby and then put the new diaper on. Then pass the new diaper to their partner along with the old diaper, then that girl will need to change the diaper. The first ones to finish need to throw their hands up and say "done" and they are the winners. 
    3. We had to do this a little different b/c not as many girls showed up as planned so we had enough for each girl to have her own pretend baby and diaper. The winner was whoever finished first and put the diaper on correctly. This was so funny to watch b/c a couple of the girls had put the diapers on the stuffed animals in the craziest ways. One put a leg and arm in the diaper instead of 2 legs. We were all busting up at this. That is definitely one I had a picture of. 
  2. Baby Word Game- This one is a common game at baby showers. Unfortunately, it was not a successful one at this shower. No one ended up winning this one. 
    1. To prep: Buy enough clothes pins for each guest. You can get the cute mini pink/blue ones that they have at the party or craft store. These are usually around $3.99 for a pack of 5-8. I think these are supposed to be used more for part of your favors or decor. I personally think the beter way to go is to head over to the craft store and buy regular old clothes pins for around $2.99 for 20 or so (sometimes you can even find mini or medium sized versions). Then buy either pink/blue (or whatever color goes with your theme) craft paint for about $.99-$1.49. Then just paint those little clothes pins however you like. Personally I think that is the cheapest fastest method. You could also Mod Podge any color/patterned paper on the craft store clothes pins...but that is a lot more work!
    2. The Game: Pin to your guests as the arrive or once everyone has arrived you can go around and pin them on everyone and then explain the game all at once. Whatever you prefer. Explain to the guests that any time someone says the word "Baby" you can steal a clothes pin from them when you catch them. Whoever has the most pins at the end of the shower or just before you do your last event (i.e. opening gifts) wins a prize. 
  3. What's In The Bag?-
    1. To prep: Buy 5-8 small baby related items. You can pick some up for cheap at some of these places: the dollar store, Big Lots, Walgreens or sometimes the grocery store has decent prices. You will also need to pick up some brown paper bags (I got a good size pack at the Dollar Tree).  Bag up each item in it's own paper bag and then staple them shut. Number each bag with a marker. *You may want to make your answer list before you bag each item up.* Place all of the bags in a basket or small box.  You will also need to provide a piece of paper to each guest for them to write their answers down on. I chose to just make a little template on my computer and print it out. I just put "What's in the bag?" at the top and numbered 1-8 with lines for the answers. 
    2. The Game: You can either place the basket in front of the guests and let them take turns passing along various bags or you can hand them out one by one and give them each an allotted time to feel the bag and write down their guess as to what's inside.  At the end, check their answers and whoever has the most correct answers is the winner. You may end up with a couple. Here is a list of the items I used for the game: pacifier (binky, soother, plug), teething ring, baby powder, diaper cream, diaper, 1 baby sock (if you put both that makes it too easy. the girls kept guessing nursing pad, which is a good idea!), spoon, small bottle. 
  4. Guess The Size of Mommy-To-Be's Belly- 
    1. To Prep: purchase either ribbon, string, or use some leftover streamers from your party decor. I just bought a couple rolls of baby themed streamers at the Dollar Tree. 
    2. The Game- have each guest tear off a piece of string/ribbon/streamer that they think will measure around mommy-to-be's belly perfectly. Whoever is the closest (or spot on) is the winner. 
Alright, well I think that about covers the first baby shower I have ever thrown. Overall, I think it went pretty well. Unfortunately the weather was a bit awful that day and not as many guests showed up, but we still had a fun little crowd and I was pleased with how my plans turned out. 

I just wanted to add that the best part of this is that it was done on a limited budget and I think it can be done with even less than I spent. I am contemplating starting an Etsy store one day where I make homemade party decor. That will probably have to wait until I have a separate craft room though. Until then, I just tell my friends that if they would like me to make anything, that I would love to help. I am willing to work with you on designs and such. So, if you have a party coming up, let me know if you would like something made and let's see if it can be done. Pricing depends on the item and supplies needed. 

Your feedback is much appreciated and loved. Please send me some love :)


MIA Since October 2012


Friends and followers, I am so sorry I have been MIA for 4 months. I seem to be on and off with my blog posting. Lots has happened since my last post.
I think I will tell the story with pictures...that sounds more fun! Don't worry, I'm still kind of sticking with the theme of my blog and including photos of creations (crafts/decor/food)

So first comes Halloween:
This is my little display area on top of our bookshelf in our living room.

Aren't we cute little kitties?! Answer: at least one of us is :)


Next comes early November: Elise had her first birthday! I had so much fun planning her little party and decor. Despite the fact that my husband thought it was a little over the top...but HELLO, she only turns 1 one time! And, it definitely wasn't over the top in comparison to some of the party ideas I was looking at on Pinterest! Here are a few pictures from her party...
Someone was a little sleepy during cake time, but she still enjoyed the frosting.  I made the little cake which was a boxed spice cake mix and homemade cream cheese frosting. I bought the little roses that are along the botton of the cake. The banner is something the I only assembled since I didn't have my Silhouette yet. I went to a store called Pebbles In My Pocket in Orem and bought the banner pieces, cupcake pieces and letters. I then hole punched the banner pennants and strung it onto jutte. Next I tied gold, cream and pink tulle in between each piece. 
The theme was Sugar and Spice. I made a little subway sign which you can kind of see in the back left corner of the table.  I wrapped forks and straws in a brown napkin then tied them with jutte. I placed those in a shoebox I recovered with just some brown wrapping paper and decorated with flowers. I also made strawberry cupcakes with the same cream cheese frosting. In the front are mini cinnamon rolls from Costco. For the kids that were there I made PB&J star shaped sandwiches and ham and cheese crescent shaped sandwiches. For favors I ordered these amazing sugar cookies from The Sweet Tooth Fairy and had them write the letter "E" on them. I had to bag these up in cellophane bags and tied them up with ribbon. Not Shown are crackers and a couple of dips. Sticking with the spice part I made some Cheesey Buffalo Chicken Dip (you can find the recipe on the back of a regular sized Frank's hot sauce bottle) and the other dip was an Artichoke JalapeƱo dip from Costco. Also not shown, b/c it was on the kitchen counter, is an Italian Soda station. We had both vanilla and strawberry flavored syrups and club soda. 


Here is a little better shot of the banner which I also embellished with tissue poms I made. They covered the push pins nicely :)


Phew...ok next comes the big holidays... We drove to Canada for both Thanksgiving and Christmas to visit my husband's side of the family. The first trip was mostly so that the hubby could go elk hunting with his uncle. And of course, we had to take the trip up for Christmas so Elise and I could spend our first Christmas up there. Overall, it was fun to be with family for almost 3 weeks. I know not everyone is as fortunate as I to have married into such a great family. I feel pretty lucky. 

Here's just a little of December:

Again, this is my bookshelf display. 
We discovered this adorable children's store called Three Little Monkeys. This was outside of their store. We just got a kick out of how Santa had crashed into the tree and he was barely hanging on.
Someone is NOT a fan of Santa! lol. This was at Jorden's Campbell grandparent's house. 


Shoot, let's rewind a little bit... just before we left for our trip... actually, at approximately 6am December 8th we found out some big news!   
Wahoo!
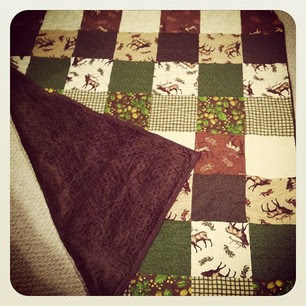
Alrighty, back to the timeline... so we're up in Canada and basically the whole trip I am cursed with morning sickness pretty much all throughout the day. I still managed to finish Jorden's Christmas present:
I thought this fabric was just fitting since he was on this kick to get an Elk! The front is flannel and the back is minky. What a cozy quilt! This is my first so it was a pretty simple pattern. 


Ok, so my "morning sickness" and all the throwing up lasted on and off until I hit 15 weeks.
I'm finally feeling 100% and able to craft and cook my little heart out again. And let's just say, I've been trying to take full advantage.

A few things you will see in the posts to come (not in this order):
  • Pictures and tutorial from a baby shower that I threw for my dear friend Tori
  • Recipes for homemade marinara and meatballs
  • Greek Souvlaki wraps
  • My Italian Flag inspired pasta- This is one of my besty's faves!
  • Homemade burp cloths, a baby quilt, swaddle blankets, and a couple other baby items (along with links to their tutorials)
  • My attempt at making a nursing cover
I know, lots of baby related crafts right now.  What can I say though, I have 5 friends that are pregnant right now. This does not include my own baby to come.  3 of my friends are actually due next month, so I really have to get down to business with my sewing machine! I've got some great fabric coming in for a quilt I am making for one of these girl's baby boy. I am just ecstatic about making this quilt and am hoping to have it done in time to mail it to my mother-in-law to quilt for me. I can't wait to show you all! 

I hope you all are just as excited as I am for these fun and delicious posts to come.